Friday, August 31, 2012

Zipper Floral Ring and Bracelet

I have seen zipper jewelry for a while now and have really liked them and wanted to make some for myself and I finally did. I have hesitated to make some jewelry with zippers because I didn't want to waste any of them. I fell like they are expensive even though I know they are not. I know they sell one side of a zipper like they do lace but it is even more expensive.  One of my Husbands Grandmothers passed away a few months ago and I inherited some of her sewing supplies. In the sewing supplies there were several zippers. I didn't pay for them so I don't feel so bad using them! 
Supplies: zipper, glue gun & glue, sewing machine with zipper attachment, Amate Studios ring and bracelet base and a glob on clay. 

To start making the flower you will need to take the zipper apart. I did this by cutting across the zipper. Since you will not need the pull and my zipper was extra long I cut the zipper so that I could use part of it on another project. (With the left over piece you can add a few stitched and the bottom to keep it closed.) Take one side of the zipper and make a basting stitch using the zipper foot on your sewing machine. (You can hand stitch this if you don't have a sewing machine.) Leaving long tails of thread. 


Pull the bottom thread and start to make the zipper "ruffle."


Using your glue gun add a small dot to one end of the zipper and roll the zipper to make the center of the flower.


Add a little bit of glue and roll the zipper. Keep doing this until the flower is complete. Glue the end of the zipper just slightly under the flower so you don't see unfinished ends. 


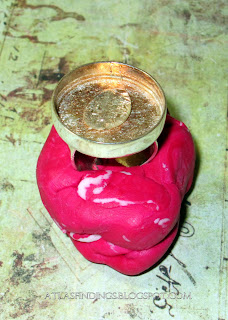
Of course I forgot to take a picture of the finished flower by itself! Now put your ring base into a glob of clay to hold the ring in place. 


Add a large amount of hot glue to the well of the ring. Add more than what is in the picture, about 2/3 full. The more glue I added to the well the more you couldn't see it in the picture. If you fill it to full when you insert the flower the glue will overflow. Then insert the flower into the ring and press gently and hold in place for a minute to let the glue start to harden.


The ring.


The bracelet.


The ring and the bracelet.


I love how these turned out! They will go with so many outfits. I will probably make a few more in other colors. I am eyeing a turquoise zipper right now! 

Tuesday, August 28, 2012

Homemade Suckers

I love suckers! There are so many flavors and shapes to choose from! I'm not sure if my favorite flavor is Banana or Root beer. Oh, wait Pina Colada! Most of the molds I have are from when my mom taught me as a kid how to make suckers. Suckers are actually pretty easy to make and take about an hour from start to finish. 
Start by gathering your supplies. You will need sucker sticks, sucker molds and clips,bags and twist ties,  food coloring, flavorings,candy thermometer, cooking spray, medium saucepan and either a marble or granite slab. You can purchase molds and clips, food coloring and flavorings from Sweet Creations online. They have a variety of molds, flavorings and colorings. 


 Start by assembling all of your molds. Put the clip on the mold then insert the sucker stick. Make sure the sucker stick end is towards the center of the mold and centered from top to bottom. The recipe makes approximately 25 suckers. I will usually assemble 30 molds just to be safe.


 Lay the molds onto a marble or granite slap. Spray the molds lightly with cooking spray.


Using a medium saucepan mix sugar, corn syrup and water. Bring mixture to a boil stirring only to get the mixture mixed together.


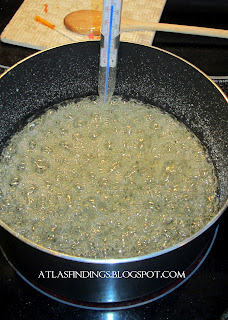
Once the mixture is boiling stop stirring and insert candy thermometer. Don't let the candy thermometer touch the bottom of the saucepan. 


Once the temperature reaches 260 degrees add a few drops of food coloring. If you want the color to look creamy you can also add some white food coloring at this time other wise the color will look a little transparent.


Do not stir! Because the mixture is boiling it will mix the coloring naturally. Now the mixture needs to reach 300 degrees. The temperature raises a lot faster from 260 to 300 degrees than it did to get to 260. So don't go very far. 


Once mixture has reached 300 degrees take off of heat immediately. If the temperature goes over 300 the suckers can have a burnt or scorched flavor. Stir in the flavoring. Be careful when stirring in the flavoring, it can boil up more and flavor fumes/steam can raise up and possibly make you cough. Especially true when using cinnamon or mint flavors. Carefully pour mixture into greased molds. 


When you are done pouring the mixture into the molds look at the molds and make sure the sucker sticks are covered. If they are not you can push down the sucker sticks to cover them. Let the suckers cool for at least a half an hour before removing them from the molds. 


 Once suckers are cooled and take out of the mold, insert the suckers into bags and tie with either twist ties or ribbon.


Make a variety of flavors and give them as gifts! This bouquet of suckers has cinnamon, watermelon, pina colada and bubble gum flavors. You can see how the yellow is a little see through and the green isn't. The green has the white food coloring added to it. I also don't suggest making two batches at once. I have tried and the second batch usually doesn't turn out. It usually gets to hard before I can pour it or it gets grainy. Temperature times and cooling times vary depending on the temperature outside and in your home. I live in Arizona and when cooking in the summer I try to make these in the morning when it isn't as hot.


Homemade Suckers

Ingredients:

2/3 cup light corn syrup
3/4 cup water
2 cups sugar
1 dram or 1 tsp of flavoring ( I use LorAnn and Sweet Creation flavors)
Food coloring ( I use the paste colorings and use a sucker stick to add the color)
Sucker molds and clips
Sucker stick
Bags
Twist ties or Ribbon

Directions:

In medium saucepan, mix together sugar, corn syrup and water. Stir over medium heat until sugar dissolves. Bring mixture to a boil without stirring. When syrup temperature reaches 260 degrees, add color. Do not stir; boiling will incorporate color into the syrup. Remove from heat at 300 degrees. Let bubbles die down and add in flavoring and stir. Use caution when adding flavoring to avoid rising steam. Pour syrup into lightly greased candy molds. When cooled, take out of mold, wrap in bags and store in air tight container. 


I was featured at:

Tickled Pink at 504 Main


Monday, August 27, 2012

Easy Chicken Pot Pie

Chicken pot pie always scared me because of the crust. I've never been able to make a good pie crust so I usually buy a pre made crust if I am making a pie. My kids don't really care for the traditional Chicken Pot Pie so I have created my own recipe.

Pre heat oven to 350 degrees. Cut two pounds of chicken into one inch pieces. Put into a large mixing bow. Mix in can of cream of chicken soup, mixed vegetables, medium cheddar cheese, garlic powder, salt and pepper to taste. Pour mixture into a greased 9 X 13 pan.


 Cook mixture uncovered for 40 to 45 minutes until chicken is cooked all the way through and the mixture is bubbly.


Take pan out of the oven and add two cans of pre made biscuits to the top of the bubbly mixture. 


Cook mixture and biscuits for the time called for to bake the biscuits.


Take out of the oven and enjoy!


You can use canned or precooked chicken for this recipe. You don't have to cook the mixture as long, just make sure the mixture is bubbly before adding the biscuits so that the bottom of the biscuits cook.This recipe is nice because you can scoop it up into perfect portions. We don't usually have any left overs. 

Chicken Pot Pie

Ingredients:

2 pounds of chicken cut into one inch pieces
1 can of cream of chicken soup
1 cup medium cheddar cheese
12-14 oz of Frozen Vegetables (I use 1/2 a bag each of corn and peas and carrots)
1/2 tsp garlic powder
salt and pepper to taste
2 cans of pre made biscuits

Directions:

1. Pre-heat oven to 350 degrees
2. Mix the chicken, cream of chicken soup, cheese, frozen vegetables, garlic powder, salt and pepper in a large mixing bowl. 
3. Pour mixture into a greased 9 X 13 pan.
4. Bake uncovered for 40 to 45 minutes until the chicken is cooked and the mixture is bubbly.
5. Take mixture out of oven and add the biscuits on top of the bubbly mixture.
6. Bake the mixture and biscuits for the time called on the biscuits packaging. (usually around 14 minutes)
7. Take out of oven and enjoy!


Tuesday, August 21, 2012

Up Cycled Bangle Bracelet

While recently shopping I saw some cute bangle bracelets that had flowers on them. I knew that I could make my own! And definitely for a lot less money! The best thing is that very few supplies are needed and you probably have them laying around. For this I used vinyl fabric, thread, scissors, needle, button or button maker and extra fabric if you want to make your own button and a flower pattern. These particular Bangle Bracelets are from Amate Studios

 Cut out flower pattern. Pin pattern onto vinyl fabric and cut. Cut two flowers of the same size.  

 Now with a crap piece of vinyl material you will make a button. Below are the pieces that come with a button kit. There is a round plastic piece that you will use to trace the fabric with. A top and a bottom to the button, a white piece that you will put the button in and a blue piece that you will use to push the pieces together. 


Use the round plastic piece to cut a piece of fabric out. 


Now you will start to layer the pieces to make the button. Put the fabric right side down on the table. Put the inside of the button (the rounded piece) on top of the fabric. Now you will put those two pieces into the white plastic. Now you will push the fabric pieces on top of the inside button piece and then put the outside piece of the button on top holding together. Now using the blue piece push the outside piece of the button down with firm pressure until the button is formed together. Pop out of the white piece and you have a button! 

 The final button! 


Layer the two flowers on top of each other so that the petals are alternating and not directly on top of each other. With the needle and thread starting in between the layers so that you don't see the end sew a circle (about where the white circle is)  in the center of the flowers and pull tightly like you are making a ruffle. Finish the stitch on the top side of the flowers and don't tie off the end yet. 


Now you will add the button to the top of the flower. The button loop isn't very big and might take a little bit of playing to get the button sewn on. Now you will start to sew the flower onto the bangle bracelet making sure to stitch in between the two layers of flowers so that you don't see the stitching on top.


Finish by tying a know in between the layers of the flower and cut the end off. 


Enjoy your flower bracelet! 


The teal flower was my trial and error one. I tried making it with sewing individual petals together. While you can't tell in the photo it is a much more flimsy flower and the button feels loose because of the flimsy base. 


Saturday, August 18, 2012

5 Strand Braided Suede Bracelet

While I love Pinterest it can be very frustrating! Most of the time when I "pin" something I try and click all the way through to the actual website. I want to make sure there are directions if there are supposed to be. Recently there was a pin that had several bracelets on it that were handmade. While the pictures showed what to do I need the written directions also. Well I pinned it and looked at it later and it directed me to a sight that was in another language. Not so big of a deal because I just clicked on interpret. Well when I did that it was a log in page that you needed to sign up for. Well I'm not one to sign up for a page when it is originally in another language so I was very frustrated. So my goal is to make several of the bracelets with written directions and pictures. We will see how I do!

Supplies Needed - Suede cording, pliers, scissors, ribbon crimps, jump rings, clasp, and something to help hold the suede cording together like a clip or you can knot the ends and put it around a nail in a piece of wood.

Start by measuring your wrist. Now times that measurement by 2. If your wrist is 7 inches you will get 14 inches. Now cut 5 14 inch pieces of the suede cord. Lay the suede cord pieces right next to each other. Clamp the ends together with the clip.


Each time I do this I have to start over a couple of times. So don't get to frustrated if you have to start over. Starting from the left side take the first three pieces and braid them together making sure the furthest left piece is on top of the second piece and  under the third piece.


Now it will look like you have two pieces on the left and 3 pieces on the right. Now you will use the 3 pieces on the right and braid them together. You will do the opposite of what you did on the left side. So you will make sure the furthest right side is over the fourth piece and under the third piece. Now you will go back to the left side where there should be 3 pieces and braid together. 


You will continue to go from left to right making one braid on the left and then one on the right. Remembering to start with the out side piece. I know that this is a little confusing but once you start playing with it it will get easier. Continue till you get the length you want.


You will actually have length left over. It makes it easier to braid if you have longer pieces.


I couldn't photograph the next step because I was using both of my hands to do it and no one else was at home to help. Cut the excess ends off of the braid in a straight line. Once cut hold the ends together and put the ribbon crimp on the ends. Use the pliers to crimp together. Now take off the clip from the other side and hold together. Cut the braid to the length you want. Remember when cutting that you will be adding a little extra length when you add the ribbon crimp, jump ring and clasp. Add the ribbon crimp to the ends. Use the pliers to crimp together. Add a jump ring to both ends of the ribbon crimps. Add a clasp to one of the ends. 


Here is the final product! I made one in green and one in black. The green photographed better but I kind of like the black one better in person. 


I hope my directions weren't to confusing and that they will actually help!  Now I have to decide which bracelet I will make next!