Showing posts with label recipe. Show all posts

Saturday, November 3, 2012

Apple Fritters


When I found this recipe from Seemingly Greek I pinned it on pinterest earlier this year because I love getting Apple Fritters from the grocery store. I printed it and put into my recipe binder to make someday. Then a few weeks ago I was again looking on pinterest and found a recipe pinned it on pinterest and printed it out. When I looked through my recipe binder I realized that I printed the recipe twice. I guess that means I should make the recipe. It was actually pretty easy to make and yummy too!


Apple Fritters

Ingredients:

1 heaping cup of flour
1/2 cup sugar
1 tsp baking powder
1-2 teaspoons cinnamon
dash of salt
1/4 teaspoon nutmeg
1/2 teaspoon vanilla
1 tablespoon melted butter
1 egg
1/3 cup milk (+ more if needed)
1 - 1 1/2 cups chopped apple, peanut size ore smaller

oil for frying

Glaze: 1 cup powdered sugar and 1 tablespoon milk

Directions:
Mix all dry ingredients together, slowly add the wet ingredients minus the apple. Carefully mix until well combined but not overly beat, gently fold in the apple pieces. The batter should be the consistency of a light cake mix. Once the oil is ready, using a cookie scoop, place a few balls of dough into the oil. Be careful not to overcrowd the balls. watch carefully for the underside to turn golden brown, then gently flip over and continue frying until done. I used a skewer to flip the fritters over. They will cook approximately 45 seconds on each side. I cooked one by itself first to see if it was done in the center and adjusted my time from there. When the fritters are done cooking set them on a paper towel to catch the extra grease. When you are all done cooking the batter, mix the ingredients together for the glaze. Dip each fritter into the glaze and set on a cooling rack with a paper towel underneath to catch any extra glaze that may drip off. Serve and enjoy!

Sunday, October 14, 2012

Chocolate Peanut Butter Popcorn

I'm addicted to flavored popcorn. Enough said! Here is a recipe for Chocolate Peanut Butter Popcorn. 


Chocolate Peanut Butter Popcorn

Ingredients:
12 cups air popped popcorn 
1/2 cup softened butter
3/4 cup brown sugar
1/2 cup peanut butter
3/4 cup melted milk chocolate chocolate chips

Directions:
  1. Pre Heat oven to 250 degrees F
  2. Pop popcorn and set aside.
  3. In a large glass bowl combine the butter, brown sugar and marshmallow cream. 
  4. Cook mixture in microwave for 3 minutes. Stopping in between each minute to stir. 
  5. Stir in peanut butter and mix until smooth.
  6. Pour mixture over the popcorn and stir quickly til coated evenly.
  7. Pour popcorn into a oven safe pan. (I use a jelly roll pan or a large cake pan) Bake for 45 minutes. Stir every 15 minutes. Take out of oven.
  8. Melt milk chocolate chips and then put into a pastry bag and drizzle over the baked popcorn and stir till chocolate is coating the popcorn. 
  9. Let cool and store in air tight container.

Thursday, October 11, 2012

Salted Caramel Pretzel Chocolate Chip Cookie

Now try and say that twice! Salted Caramel Pretzel Chocolate Chip Cookie. Yep, it is exactly what it says it is. I found this recipe on Pinterest via The Diary of Daves Wife. Basically if it has all of my favorite ingredients listed in the title it must be good. And it is!

Salted Caramel Pretzel Chocolate Chip Cookie

Yield: About 34 Cookies

Ingredients:
3/4 cup butter, softened
3/4 cup brown sugar
1/4 cup granulated sugar
1 egg
2 tsp vanilla
2 cups flour
2 tsp cornstarch
1 tsp baking soda
1/2 tsp salt
1 cup chocolate chips 
1 cup caramel bits
1/2 cup pretzel pieces
Sea Salt

Directions:

1. Pre heat oven to 350 degrees F
2. Cream together butter and sugars until light and fluffy. Add egg and vanilla and blend in.
3. Mix in flour, cornstarch, baking soda and salt.
4. Stir in Chocolate Chips, Caramel bits and Pretzel pieces.
5. Scoop dough onto baking sheets and sprinkle with Sea Salt. 
6.  Bake for 8 to 10 minutes until almost golden brown.
7. Cool for 5 minutes and remove onto a cooling rack.

Original recipe called for milk chocolate chips I used semi sweet because that is what I had. It also called for crushed pretzel pieces, I didn't totally crush mine because I wanted to taste pieces and didn't want them to get lost. Next time I will double the recipe they were so good.I ate one last night, one at work and two after dinner!   When I left for work this morning I put a sign on the cookies saying, " Don't eat all of the cookies, Love, Mom."  It actually worked. Most of the time when I make a dessert in the evening the next day when I get home from work there isn't any left. The kids actually listened to my note! 

Saturday, October 6, 2012

Fruit Salsa

Sounds weird right? In my church I serve with the Young Women. For one of our combined activities we had a salsa challenge. There was one long table with a lot of ingredients. We divided into our three class groups, then we went to the table and grabbed what ever ingredients that we wanted. The girls grabbed the typical tomatoes, jalapenos, cilantro, salt, pepper, green bell peppers and onions. I then started to grab the mango, strawberries, pineapple and lime. We brought all of the ingredients to our table and started cutting everything! We made two salsas but could only be judged on one. Not that the traditional salsa was bad but the Fruit Salsa was much better! For the judging it was a tie between our Fruit Salsa and a traditional salsa. The traditional one won by a coin toss! Next time I think we would have three judges instead of two.


The Fruit Salsa was so good that I brought about 2 cups worth home. The next day on the way to work I stopped a bought a bag of tortilla chips to eat the fruit salsa with.  I was in a non sharing kind of mood with this oh so good salsa that I only shared it with one  co-worker and we basically ate  almost the whole thing by ourselves. So of course I had to make more a few days later. I made enough that I wanted to can it. Now you don't have to can it. It taste so good that you would probably use (eat) it all before it goes bad in the refrigerator.  I scoured the internet (looked at a few recipes) to see if there was anything special that I needed to do. I couldn't find anything special to do other that some recipes for Mango Salsa say to use green mango's not ripe ones. I was afraid of the fruit turning colors so I did add some fruit fresh and did use green mango's. Next time I would go ahead and use ripe mango's because I wanted to eat some salsa right away and some bites of mango were hard. No bueno!  Here is a picture of the finished product. 


Fruit Salsa
Yields: 5 1/2 pints 

Ingredients:
2 large Mango's or 4 small/medium Mango's
2 Pineapples
2 lbs of strawberries
2 jalapenos
Cilantro to taste
Juice from 2 limes
1 tablespoon Sea Salt
Gloves

Directions:
  1. Cut up fruit (Mango, Pineapple, Strawberries) into small bite size pieces - About a quarter of an inch in size.
  2. Using gloves cut up jalapeno into very tiny pieces. You can keep the seeds for more heat or eliminate them. 
  3. Finely chop the cilantro. 
  4. Mix the fruit, jalapenos, and the cilantro. 
  5. Add the juice from two limes. (Before you squeeze them cut them in half then roll them on the counter or cutting board to loosen the juice. It will make it easier to squeeze.)
  6. Add the salt.
  7. Mix all ingredients well.
  8. At this point you can eat it and refrigerate any left overs. If you want to can it you will need to put the ingredients into a pot and cook for 5-10 minutes to get the mixture hot. Ladle hot fruit salsa into hot jars, leaving 1/4 inch headspace. Remove air bubbles. Adjust two-piece caps. Process 15 minutes in a boiling water canner.

Thursday, October 4, 2012

Key Lime Cupcakes

I don't now about you but I usually make the same desserts over and over because they are good and familiar. I have been trying to broaden my scope of recipes. I've never tried anything flavored with lime before except a Cherry Limeaide from Sonic. So I decided to try this Key Lime Cupcake recipe. I must say that it was quite refreshing!


Key Lime Cupcakes

Recipe:

1 3/4 cups cake four
1/2 teaspoon baking powder
1/2 teaspoon baking soda
1/2 teaspoon salt
1/2 cup cool unsalted butter, cut into 8 pieces
1 1/4 granulated sugar
2 large eggs at room temperature
2 1/2 tablespoons key lime juice
1 tablespoon key lime zest
1 drop of green food coloring
3/4 cup buttermilk at room temperature

Frosting:

1/2 cup cool unsalted butter, cut into eight pieces
8 ounces cream cheese at room temperature cut into 8 pieces
2 1/4 cups powdered sugar
1 tablespoon key lime zest

Directions:

  1. Pre heat oven to 350 F. Line cupcake pans. 
  2. Mix the cake flour, baking powder, baking soda and salt, set aside
  3. Using a mixer beat the butter on low until it's softened a bit. 
  4. Add the sugar and increase the speed to medium. Beat until fluffy.
  5. Add one egg at a time, beating well after each addition.
  6. Add lime juice, zest, and food coloring and beat until mixed. (The mix will look curdled)
  7. Add the flour in three additions, alternating with the buttermilk, beginning and ending with the flour, scraping down the bowl as necessary. Mix on low until combined. 
  8. Fill each cupcake liner 2/3 full.
  9. Bake 20 to 25 minutes. Cool completely 
  10. For the frosting, mix the butter on low until it's softened. Increase the speed to medium and add the cream cheese one piece at a time. Reduce speed to low and slowly add powdered sugar until combined. Beat in the key lime zest.
  11. Frost the cupcakes and enjoy!
You can make approximately either 36 mini cupcakes and 12 regular size cupcakes or 24 regular size cupcakes. 

I thought I "pinned" this recipe. I can't find it even looking with Google. So if this is your recipe let me know and I will credit you! 

Tuesday, September 25, 2012

How to Make Cake Flour

It is still Tuesday even thou it is 9:50 in the evening. I hope you can find this tip as useful as I have. Have you ever come upon a recipe that called for cake flour and passed it up because you didn't have any? I have on occasion or I just used All Purpose Flour and wondered if it really made a difference. The difference between the flours is the gluten. The more protein the wheat has the more gluten it has. Gluten is the element responsible for making the end result either tough as in breads or airy and crumbly as in cakes or pastries. I'm not one to have different types of flours on hand. So when making some recipes that called for cake flour I wondered if you could make your own? Sure enough you can! It's actually pretty easy. 


Cake Flour

Ingredients:

All Purpose Flour
Corn Startch

Directions: 

Measure out one cup of all purpose flour and pour it into a bowl. Now with a tablespoon take two table spoons of the flour out of the bowl and return it to the flour bag. Now measure out two tablespoons of corn starch and add it to the flour in the bowl. Mix the all purpose flour and corn starch together with a sifter. Now you have cake flour! Now the trick is to remember this when baking!

Wednesday, September 19, 2012

Lemon Blueberry Muffins

I tend to make the same kind of muffins and wanted to make a little something different. I really like a lemon cake and I like blueberry muffins so I decided that I could combine the two. Muffins are really easy to make and make for a quick something to grab on the way out the door in the morning.
 

These Lemon Blueberry Muffins are chalked full of blueberries that you get a mouth full in every bite!


Lemon Blueberry Muffins

Ingredients:

1/2 cup softened butter
1 cup sugar
2 eggs
1/2 cup milk
3 tbls lemon juice
2 tsp grated lemon peel
2 cups flour
2 tsp baking powder
dash of salt
2 cups fresh blueberries

Glaze:
1 1/2 cup powdered sugar
2 tbls lemon juice
2 tsp butter melted
1/4 tsp vanilla
1 tbls milk

Directions:
  1. Preheat oven to 400 degrees F
  2. Mix butter and sugar together
  3. Mix eggs in one at a time, set aside.
  4. Mix four, baking powder and salt together.
  5. Mix flour mixture into the butter, sugar and eggs mixture.
  6. Mix in milk, lemon juice and lemon peel. 
  7. Fold the blueberries into the mixture.
  8. Fill baking cups 3/4 full. Bake at 400 degrees F for about 25 minutes. Depending on your oven you may need to cook a little less or a little more til golden brown.
  9. Mix Glaze ingredients together. 
  10. Cool muffins and then drizzle the glaze on top.  


Wednesday, September 12, 2012

Ultimate Smore's Brownie

Who doesn't love a good brownie? Who doesn't love s'mores? What about salted caramel? How about combining all three? First you start by lining a 9x13 pan with foil with the foil hanging over the edges. Spray the foil with non stick spray.


Make the graham cracker crust and pack it into the lined pan. Bake the graham cracker crust.


While the crust is baking mix the brownie mix according to directions on the package. Pour the brownie mix into the baked graham cracker crust.


Bake brownies according to directions on box. Take out of oven and layer the brownies with chocolate chips and marshmallows. 


Turn on top broiler. Broil the brownies for up to two minutes. DO NOT walk away from them. Watch the marshmallow brown in the oven. Take out when they are golden brown.


Let the brownies cool on a cooling rack. Using the foil, take the brownies out of pan and place on a cutting board. With a wet knife cut the brownies. Re wet the knife in between cutting. This will help prevent sticking and make a cleaner cut. When ready to serve, drizzle with a salted caramel sauce. 


Make sure to have a glass of milk handy with this very rich dessert! Enjoy! 


Ultimate Smore’s Brownies
By Susan Johnson

Ingredients;
Crust:
6 tablespoons unsalted butter, melted
1 1/2 cups crushed graham cracker crumbs
2 tablespoons sugar
Pinch fine salt

Brownie:
Favorite Store bought brownie mix
Topping:
1 cup chocolate chips
5-10 ounces of small marshmallows

Salted Caramel Sauce:
Follow recipe here or
Caramel Sauce from store
1 1/2 tsp salt


Directions;
  1. If making the salted caramel sauce from either scratch or by simply adding salt to a pre made sauce do so now.
  2. Heat oven according to directions on package of brownie mix. Line a 9x13 pan with foil so it hangs over the edges by about an inch.
  3. For the Crust: spray foil with cooking spray. Stir the butter together with the crumbs, sugar, and salt into a medium bowl. Press the crumb mixture evenly over the bottom of the pan. Bake until golden brown, about 15 to 20  minutes. 
  4.  Mix the brownies according to directions according to package.
  5. Pour brownie mix onto the baked graham cracker crust. Bake according to directions on the brownie mix. 
  6. Remove from the oven and carefully position a rack about 6 inches from the top broiler. Turn top broiler on. Then layer the chocolate chips and marshmallow on top of the brownies. Toast the marshmallows under the broiler until golden brown. Keep an eye on them, they can go really quick, only about a minute and a half. 
  7. Cool brownies on a cooling rack.
  8. Gently remove the brownies from the pan using the foil and place on a cutting board. 
  9. Carefully separate any marshmallows from the foil and fold the foil away. 
  10. Wet your knife by running it under the sink. Cut the brownies, wetting the knife in between cuts to prevent sticking and to help make a clean cut.
  11. When serving drizzle the salted caramel sauce on top of the brownies. 
  12. Enjoy with a glass of milk!


Wednesday, September 5, 2012

Homemade Marshmallow Cream

I was recently having some guest over and I wanted to make Whoopie Pies for them. Basically the main ingredient for the filling is marshmallow cream. I knew I didn't have any so I had to go shopping.  When I went to one of the local and closest grocery stores they didn't have any because it is a seasonal item. Well I new I could have gotten it at Target but I didn't want to make another stop just for Marshmallow Cream. I thought I saw somewhere that you could make your own. I quickly used my smart phone at the store to make sure that I had all the ingredients at home and I did! It's actually pretty easy to make. If you saw one of my last post on how to make Homemade Suckers, this gives you another reason to get a candy thermometer!


Homemade Marshmallow Cream
Ingredients: 

3 large egg whites
1/4 teaspoon cream of tartar
2 tablespoons granulated sugar
1/3 cup water
3/4 cup light corn syrup
2/3 cup granulated sugar
1/2 tablespoon vanilla extract 

Directions: 
1. In a glass or metal bowl, beat the egg whites and cream of tartar with electric beaters on high, until light and foamy. 
2. With the mixer still running, gradually sprinkle in the 2 tablespoons of sugar. Continue beating until soft peaks form. 
3. In a small saucepan, mix the water, corn syrup, and granulated sugar together. Cook over medium heat until it boils and comes to the firm ball stage (246 degrees). Don't over cook. It can have a burnt taste. 
4. Drizzle the hot syrup into the egg whites with the mixer on low. 
5. Turn the mixer to high, and beat for 5-6 minutes, or until the sauce is very fluffy and the consistency of marshmallow cream.
6. Beat in the extract till combined. 

I found it easiest to use my stand mixer so I didn't have to hold the mixer the whole time. When done the mixture will look like store bought Marshmallow cream and will have the consistency that you would be able to pipe. This recipe made about 3 cups of Marshmallow Cream. I have also used this recipe when I needed Marshmallow Cream in fudge and I couldn't tell the difference!


Featured on Pinkapotamus

Tuesday, August 28, 2012

Homemade Suckers

I love suckers! There are so many flavors and shapes to choose from! I'm not sure if my favorite flavor is Banana or Root beer. Oh, wait Pina Colada! Most of the molds I have are from when my mom taught me as a kid how to make suckers. Suckers are actually pretty easy to make and take about an hour from start to finish. 
Start by gathering your supplies. You will need sucker sticks, sucker molds and clips,bags and twist ties,  food coloring, flavorings,candy thermometer, cooking spray, medium saucepan and either a marble or granite slab. You can purchase molds and clips, food coloring and flavorings from Sweet Creations online. They have a variety of molds, flavorings and colorings. 


 Start by assembling all of your molds. Put the clip on the mold then insert the sucker stick. Make sure the sucker stick end is towards the center of the mold and centered from top to bottom. The recipe makes approximately 25 suckers. I will usually assemble 30 molds just to be safe.


 Lay the molds onto a marble or granite slap. Spray the molds lightly with cooking spray.


Using a medium saucepan mix sugar, corn syrup and water. Bring mixture to a boil stirring only to get the mixture mixed together.


Once the mixture is boiling stop stirring and insert candy thermometer. Don't let the candy thermometer touch the bottom of the saucepan. 


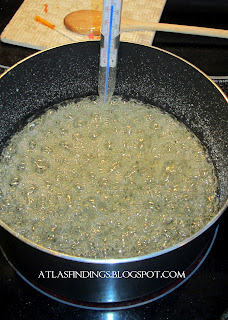
Once the temperature reaches 260 degrees add a few drops of food coloring. If you want the color to look creamy you can also add some white food coloring at this time other wise the color will look a little transparent.


Do not stir! Because the mixture is boiling it will mix the coloring naturally. Now the mixture needs to reach 300 degrees. The temperature raises a lot faster from 260 to 300 degrees than it did to get to 260. So don't go very far. 


Once mixture has reached 300 degrees take off of heat immediately. If the temperature goes over 300 the suckers can have a burnt or scorched flavor. Stir in the flavoring. Be careful when stirring in the flavoring, it can boil up more and flavor fumes/steam can raise up and possibly make you cough. Especially true when using cinnamon or mint flavors. Carefully pour mixture into greased molds. 


When you are done pouring the mixture into the molds look at the molds and make sure the sucker sticks are covered. If they are not you can push down the sucker sticks to cover them. Let the suckers cool for at least a half an hour before removing them from the molds. 


 Once suckers are cooled and take out of the mold, insert the suckers into bags and tie with either twist ties or ribbon.


Make a variety of flavors and give them as gifts! This bouquet of suckers has cinnamon, watermelon, pina colada and bubble gum flavors. You can see how the yellow is a little see through and the green isn't. The green has the white food coloring added to it. I also don't suggest making two batches at once. I have tried and the second batch usually doesn't turn out. It usually gets to hard before I can pour it or it gets grainy. Temperature times and cooling times vary depending on the temperature outside and in your home. I live in Arizona and when cooking in the summer I try to make these in the morning when it isn't as hot.


Homemade Suckers

Ingredients:

2/3 cup light corn syrup
3/4 cup water
2 cups sugar
1 dram or 1 tsp of flavoring ( I use LorAnn and Sweet Creation flavors)
Food coloring ( I use the paste colorings and use a sucker stick to add the color)
Sucker molds and clips
Sucker stick
Bags
Twist ties or Ribbon

Directions:

In medium saucepan, mix together sugar, corn syrup and water. Stir over medium heat until sugar dissolves. Bring mixture to a boil without stirring. When syrup temperature reaches 260 degrees, add color. Do not stir; boiling will incorporate color into the syrup. Remove from heat at 300 degrees. Let bubbles die down and add in flavoring and stir. Use caution when adding flavoring to avoid rising steam. Pour syrup into lightly greased candy molds. When cooled, take out of mold, wrap in bags and store in air tight container. 


I was featured at:

Tickled Pink at 504 Main


Monday, August 27, 2012

Easy Chicken Pot Pie

Chicken pot pie always scared me because of the crust. I've never been able to make a good pie crust so I usually buy a pre made crust if I am making a pie. My kids don't really care for the traditional Chicken Pot Pie so I have created my own recipe.

Pre heat oven to 350 degrees. Cut two pounds of chicken into one inch pieces. Put into a large mixing bow. Mix in can of cream of chicken soup, mixed vegetables, medium cheddar cheese, garlic powder, salt and pepper to taste. Pour mixture into a greased 9 X 13 pan.


 Cook mixture uncovered for 40 to 45 minutes until chicken is cooked all the way through and the mixture is bubbly.


Take pan out of the oven and add two cans of pre made biscuits to the top of the bubbly mixture. 


Cook mixture and biscuits for the time called for to bake the biscuits.


Take out of the oven and enjoy!


You can use canned or precooked chicken for this recipe. You don't have to cook the mixture as long, just make sure the mixture is bubbly before adding the biscuits so that the bottom of the biscuits cook.This recipe is nice because you can scoop it up into perfect portions. We don't usually have any left overs. 

Chicken Pot Pie

Ingredients:

2 pounds of chicken cut into one inch pieces
1 can of cream of chicken soup
1 cup medium cheddar cheese
12-14 oz of Frozen Vegetables (I use 1/2 a bag each of corn and peas and carrots)
1/2 tsp garlic powder
salt and pepper to taste
2 cans of pre made biscuits

Directions:

1. Pre-heat oven to 350 degrees
2. Mix the chicken, cream of chicken soup, cheese, frozen vegetables, garlic powder, salt and pepper in a large mixing bowl. 
3. Pour mixture into a greased 9 X 13 pan.
4. Bake uncovered for 40 to 45 minutes until the chicken is cooked and the mixture is bubbly.
5. Take mixture out of oven and add the biscuits on top of the bubbly mixture.
6. Bake the mixture and biscuits for the time called on the biscuits packaging. (usually around 14 minutes)
7. Take out of oven and enjoy!


Friday, August 17, 2012

Christmas Crackle

Have you heard of Christmas Crack? A few years ago someone at my church gave us some stuff called Christmas Crack. No it is not a drug although it is addicting so maybe? I didn't like the name of Crack so I started calling it Christmas Crackle. I have lost the original recipe and keep forgetting to ask for it. So of course I scoured the internet for a Christmas Crack recipe. There were ton's of them but none of them were the one I was looking for. They all had saltine crackers, chocolate and other stuff. Really? Saltine's in a dessert. Anyway, I knew the basics of the recipe so I experimented! This is one of the easiest and quickest recipes ever. Almost as easy as making rice crispy treats!


Can you see the gooey goodness this has? Now if you have any new crowns or fillings be careful!!

Christmas Crackle

Ingredients:

12 to 14oz of Golden Grahams Cereal
1 cup Butter
1 cup Light Karo Syrup
1 cup White Sugar
1 tsp Vanilla
Candy Thermometer

Directions:

1. Pour 12 oz of Golden Grahams Cereal in to a large mixing bowl. Set aside.
2. Boil together Butter, Light Karo Syrup and White Sugar. Insert candy thermometer and boil to almost firm ball stage. About 245 degrees. (From experience don't boil it longer. It will will literally become Crack and will break your teeth!) Don't walk away from the pot. It only cooks about 5 minutes.
3. Once it has reached 245 degrees take off of burner and stir in vanilla. Then pour onto cereal and stir till mixed really well. If it looks like it is a little to gooey add more cereal.
4. Pour out onto a greased cookie sheet. Let cool. Break apart and store in an air tight container. (It is almost better to store in a big rectangle container as apposed to a bowl. If it is in a bowl it tends to stick all together and  a little hard to take apart. )