Tuesday, September 25, 2012

How to Make Cake Flour

It is still Tuesday even thou it is 9:50 in the evening. I hope you can find this tip as useful as I have. Have you ever come upon a recipe that called for cake flour and passed it up because you didn't have any? I have on occasion or I just used All Purpose Flour and wondered if it really made a difference. The difference between the flours is the gluten. The more protein the wheat has the more gluten it has. Gluten is the element responsible for making the end result either tough as in breads or airy and crumbly as in cakes or pastries. I'm not one to have different types of flours on hand. So when making some recipes that called for cake flour I wondered if you could make your own? Sure enough you can! It's actually pretty easy. 


Cake Flour

Ingredients:

All Purpose Flour
Corn Startch

Directions: 

Measure out one cup of all purpose flour and pour it into a bowl. Now with a tablespoon take two table spoons of the flour out of the bowl and return it to the flour bag. Now measure out two tablespoons of corn starch and add it to the flour in the bowl. Mix the all purpose flour and corn starch together with a sifter. Now you have cake flour! Now the trick is to remember this when baking!

Saturday, September 22, 2012

Holiday Design Show

I love when Askren & Son's Wholesale in Tucson holds their design shows. I make sure to travel a couple of hours to see what they have come up with this time. There warehouse is chalked full of ideas around every corner. Sunday I was privileged to attend their Holiday Presentation. I even fell in love with the saying on their invitation. It read,
 "The Askrens believe in Christmas...from its tallest of beautiful trees, to its smallest of peppermint candies...from it's images of a winking santa, to its memories of a baby in a manger." 
I think I might steel that for my Christmas cards.  Hitomi Gilliam, AIFD was the guest designer. She is SO awesome! She makes you think outside of the box. This is the only picture I got of Hitomi and of course her face is covered! 

A lot of these pictures were taken around Askren's. They are not just of Hitomi designs. I just liked this spring arrangement.


Let it be Fall!


A variety of bud vases with succulents in them.


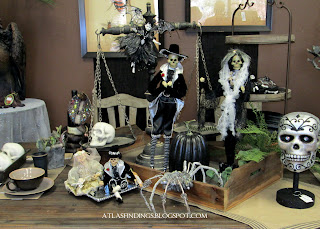
Very fun Halloween displays.


How about this for a table setting?


Dinner guest?


I love how they created their own vintage labels.


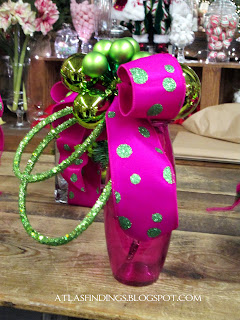
A very bright Christmas display.


Very Bright Wreath


Non Traditional Centerpieces


Green Poinsettias


A whimsical, mythical Christmas!


Picture of vintage Christmas Ornaments.

I liked the pillow, "Dear Santa I want It ALL!"


Fun wreath for the door.


Simple design for smaller spaces.


Amaryllis Centerpiece


Sometimes I take pictures of things that I want in my home!


Wednesday, September 19, 2012

Lemon Blueberry Muffins

I tend to make the same kind of muffins and wanted to make a little something different. I really like a lemon cake and I like blueberry muffins so I decided that I could combine the two. Muffins are really easy to make and make for a quick something to grab on the way out the door in the morning.
 

These Lemon Blueberry Muffins are chalked full of blueberries that you get a mouth full in every bite!


Lemon Blueberry Muffins

Ingredients:

1/2 cup softened butter
1 cup sugar
2 eggs
1/2 cup milk
3 tbls lemon juice
2 tsp grated lemon peel
2 cups flour
2 tsp baking powder
dash of salt
2 cups fresh blueberries

Glaze:
1 1/2 cup powdered sugar
2 tbls lemon juice
2 tsp butter melted
1/4 tsp vanilla
1 tbls milk

Directions:
  1. Preheat oven to 400 degrees F
  2. Mix butter and sugar together
  3. Mix eggs in one at a time, set aside.
  4. Mix four, baking powder and salt together.
  5. Mix flour mixture into the butter, sugar and eggs mixture.
  6. Mix in milk, lemon juice and lemon peel. 
  7. Fold the blueberries into the mixture.
  8. Fill baking cups 3/4 full. Bake at 400 degrees F for about 25 minutes. Depending on your oven you may need to cook a little less or a little more til golden brown.
  9. Mix Glaze ingredients together. 
  10. Cool muffins and then drizzle the glaze on top.  


Tuesday, September 18, 2012

How to Make a Sewing Pattern

I feel like I have been doing so much sewing this year. I have made lots of purses and I have made lots of skirts and shirts. Let me say that I do not like using patterns from the store. I have an attention problem when it comes to following the directions and being able to figure out what they are trying to say. So I have resorted to making my own patterns. Sometimes they work out and sometimes they don't! 
You don't need very many supplies when trying to make a pattern. Lots of times I take something lay it out,  measure it and trace it. If there is something about it I don't like I will adjust it when I am drawing. 


Basic supplies are needed. I use a yard stick, a tape measure, permanent marker, pencil, objects to trace, scissors and the most important part - wrapping paper. Yep, wrapping paper! Most wrapping papers have a grid on the back. The grid is in one inch squares and make it really easy to make patterns. In the picture above I was making a pattern for a purse. So I was using a plate to help make the rounded edges.


In this picture I have a t-shirt that has lots of stains on it that I really like. I like how it is tapered and only uses two pieces of fabric. No sleeves to sew on. So to make this pattern I one inch around the shirt to make the pattern to allow for a seam allowance. I have also done this with pencil skirts.


 When I am done making a pattern I write on it what it is and if needs be the instructions on how to sew it together. I haven't made a purse in a while. I think I will create a new one soon. But the shirt above was so easy to make that I will probably make a shirt or two before I get to another purse. Look for the shirt tutorial  coming up sometime this week. 

Wednesday, September 12, 2012

Ultimate Smore's Brownie

Who doesn't love a good brownie? Who doesn't love s'mores? What about salted caramel? How about combining all three? First you start by lining a 9x13 pan with foil with the foil hanging over the edges. Spray the foil with non stick spray.


Make the graham cracker crust and pack it into the lined pan. Bake the graham cracker crust.


While the crust is baking mix the brownie mix according to directions on the package. Pour the brownie mix into the baked graham cracker crust.


Bake brownies according to directions on box. Take out of oven and layer the brownies with chocolate chips and marshmallows. 


Turn on top broiler. Broil the brownies for up to two minutes. DO NOT walk away from them. Watch the marshmallow brown in the oven. Take out when they are golden brown.


Let the brownies cool on a cooling rack. Using the foil, take the brownies out of pan and place on a cutting board. With a wet knife cut the brownies. Re wet the knife in between cutting. This will help prevent sticking and make a cleaner cut. When ready to serve, drizzle with a salted caramel sauce. 


Make sure to have a glass of milk handy with this very rich dessert! Enjoy! 


Ultimate Smore’s Brownies
By Susan Johnson

Ingredients;
Crust:
6 tablespoons unsalted butter, melted
1 1/2 cups crushed graham cracker crumbs
2 tablespoons sugar
Pinch fine salt

Brownie:
Favorite Store bought brownie mix
Topping:
1 cup chocolate chips
5-10 ounces of small marshmallows

Salted Caramel Sauce:
Follow recipe here or
Caramel Sauce from store
1 1/2 tsp salt


Directions;
  1. If making the salted caramel sauce from either scratch or by simply adding salt to a pre made sauce do so now.
  2. Heat oven according to directions on package of brownie mix. Line a 9x13 pan with foil so it hangs over the edges by about an inch.
  3. For the Crust: spray foil with cooking spray. Stir the butter together with the crumbs, sugar, and salt into a medium bowl. Press the crumb mixture evenly over the bottom of the pan. Bake until golden brown, about 15 to 20  minutes. 
  4.  Mix the brownies according to directions according to package.
  5. Pour brownie mix onto the baked graham cracker crust. Bake according to directions on the brownie mix. 
  6. Remove from the oven and carefully position a rack about 6 inches from the top broiler. Turn top broiler on. Then layer the chocolate chips and marshmallow on top of the brownies. Toast the marshmallows under the broiler until golden brown. Keep an eye on them, they can go really quick, only about a minute and a half. 
  7. Cool brownies on a cooling rack.
  8. Gently remove the brownies from the pan using the foil and place on a cutting board. 
  9. Carefully separate any marshmallows from the foil and fold the foil away. 
  10. Wet your knife by running it under the sink. Cut the brownies, wetting the knife in between cuts to prevent sticking and to help make a clean cut.
  11. When serving drizzle the salted caramel sauce on top of the brownies. 
  12. Enjoy with a glass of milk!


Tuesday, September 11, 2012

How to Easily Shred Chicken

Often I am making casseroles with shredded chicken. And more often I don't want to shred the chicken so I just cube it. I would usually shred the chicken with two forks and that would take for ever! A while ago I saw somewhere on Pinterest that you could shred chicken with your mixer. Last week when I was making a chicken casserole I remembered that you could add your cooked chicken to a mixer, turn it on and it would shred your chicken. Well I tried it and it worked. I added 5 chicken breast to my Kitchen Aid mixer put in my paddle attachment and turned the mixer on 2. After about 5 minutes I had shredded chicken! Much less time than trying to shred it with a fork. (I haven't tried pork yet but I bet it would work too!)

Since the chicken was in the mixer I decided to add all of my other ingredients into the mixer as well. (The base for most of my chicken casseroles is chicken, cream of something soup, cheese and sour cream) 


Then I mixed the ingredients. Not only did I save time by using the mixer I saved my hands and arms from getting tired! 


I hope this Tip on Tuesday helps you as much as it has helped me in your casserole making!